Comparison Course
Welcome to the ORKG Comparison Course. This course walks you through everything related to ORKG Comparisons and aims to help beginners make their way through the Comparison creation process while also inspiring everyone who is interested in using the ORKG by showcasing veteran user’s contributions and how they utilize comparisons in their research.
Introduction
What is an ORKG Comparison?
Comparisons are the core type of ORKG content and give a condensed overview on the state-of-the-art for a particular research question. Contributions towards the problem are organized in a tabular view and can be compared and filtered along different properties. An example from virology could be a comparison of different estimates for COVID-19’s basic reproduction number, in materials science we might be interested in the solubility parameters of different compounds and for computer science, a comparison of algorithms performances can be useful. With ORKG Comparisons, information from dozens or hundreds of papers can be condensed in one overview.
Possible Goals and Use Cases
So, what can be done with Comparisons?
-
Larger comparisons can be filtered based on values of certain properties using a faceted browsing approach (see this publication on Leveraging a Federation of Knowledge Graphs to Improve Faceted Search in Digital Libraries).
-
Comparisons can be accompanied by visualizations, which map the data from a comparison to various chart types.
-
Comparisons can be exported in various formats, such as CSV, LaTeX, RDF, PDF.
-
Metadata (e.g. authors, contributors, descriptions, etc.) can be associated with comparisons and they can be formally published using stable DOI identifiers.
-
The data underlying a comparison can be programmatically accessed using the API and for exampe, embedded and republished in another web page or further processed using Jupyter notebook.
You can also look at what other ORKG users have accomplished with their comparisons. Just browse their stories or take a look at the benefits of contributing to the ORKG.
Creating Comparisons
There is not only one way to create comparisons in the ORKG. Which way is the right one for you depends on what you have as a starting point.
Comparing papers that are not yet in the ORKG
This way is for you if you have at least 2 papers that you want to compare using the ORKG that you first also want to add to the ORKG. Check out this tutorial.
Comparing papers that are already in the ORKG
Check out this tutorial if you found at least 2 interesting papers that you want to compare in the ORKG.
Creating Comparisons via CSV import
If you already have a collection of comparable papers in machine readable formats, you could consider importing them into the ORKG as a comparison. You will find more information on how to do it here.
Creating a comparison from papers not yet in the ORKG
This tutorial shows you all the steps for adding a comparison for papers that are not yet added to the ORKG.
-
Step 1: Sign in
-
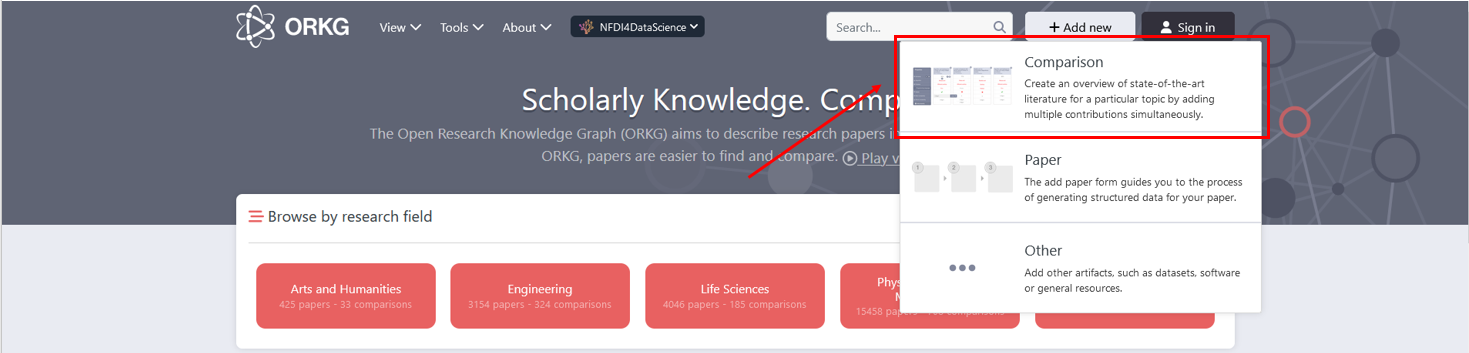
Step 2: Click on Add new and then Comparison
-
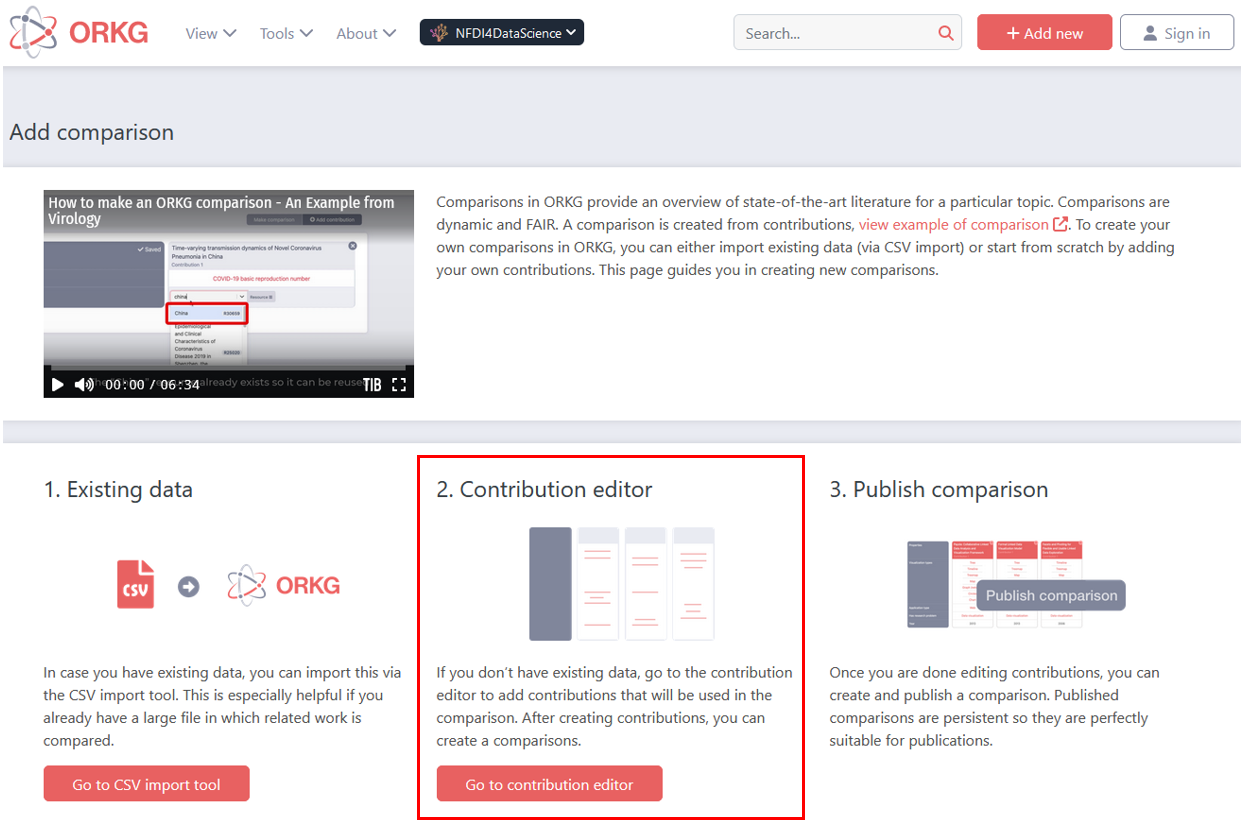
Step 3: This leads you to an overview page for adding comparisons. Choose option 2 "Contribution editor"
-
Step 4: Now the contribution editor has opened. To add your first contribution click on Add contribution on the top right.

-
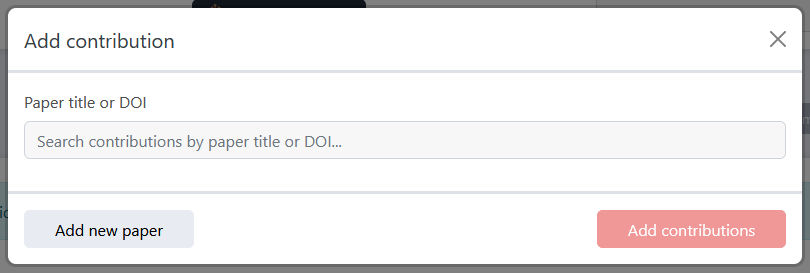
Step 5: A pop-up window will appear. If you are not sure whether your paper might not already exist in the ORKG, you can enter the paper title or DOI. For adding papers that are already added to the ORKG check out this tutorial instead. For this tutorial, we assume you want to add your papers from scratch. So now, click on Add new paper on the bottom left of this pop-up window.
-
Step 6: A new pop-up window will appear, which will ask you to create a new paper in the ORKG. If you need help with adding papers, this course might be interesting for you.
-
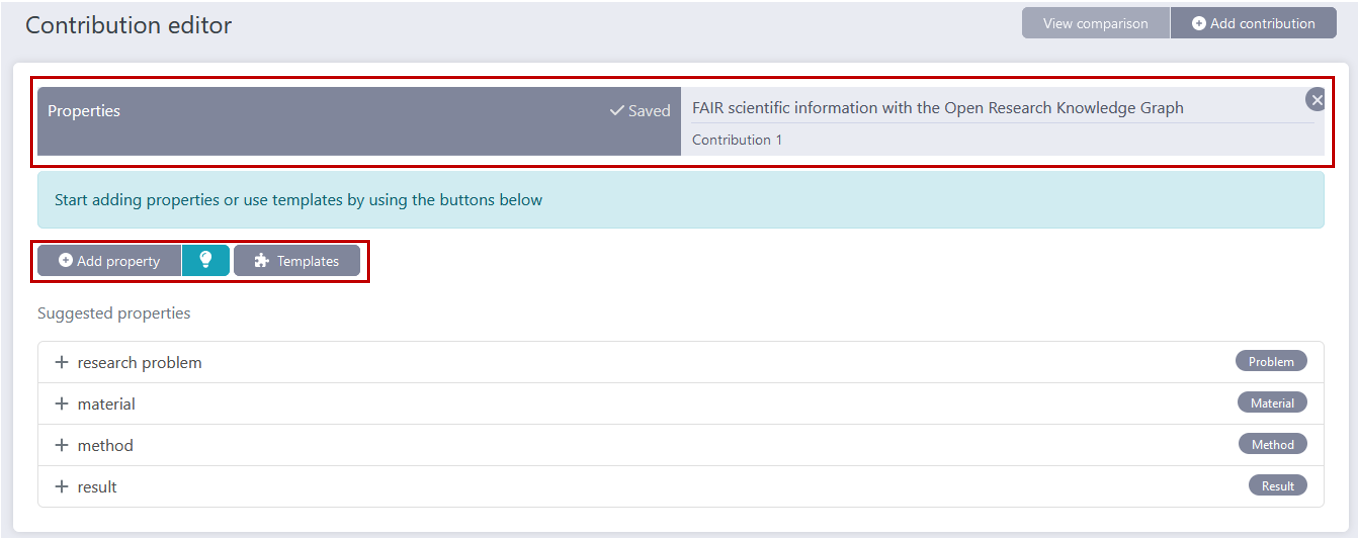
Step 7: You can now see that the paper has been added to the contribution editor and you can start to model your data. You can add new properties by clicking on Add property or use a template by clicking on Templates. If you need help with semantic modelling, check out our article on that topic here. If some of the papers you want to compare are already present in the ORKG, you can also add those additionally to the newly added ones. For how to do this, please click here.
-
Step 8: Once you have added at least 2 contributions, click on View comparison. Now you can see a preview of the comparison that you can tweak to your liking. Please also see here, for information on how to organize the comparison.
-
Step 9: If you are satisfied with the comparison, you either publish your comparison. You can also save it as draft and come back to work on it later. For details on how to do that, please take a look here.
If you want to watch someone else before you try it out yourself, you can also have a look at this video:
Creating a comparison from papers in the ORKG
This tutorial shows you how you can create an ORKG Comparison from papers that have already been added to the ORKG beforehand. To accomplish this, you have two options:
Option 1 - Using the Contribution Editor
-
Step 1: Sign in
-
Step 2: Click on Add new and then Comparison
-
Step 3: This leads you to an overview page for adding comparisons. Choose option 2 "Contribution editor"
-
Step 4: Now the contribution editor has opened. To add your first contribution click on Add contribution on the top right.
-
Step 5: A pop-up window will appear. Here, you can now search for the relevant papers by entering the paper title or DOI. Then, click on Add contributions
Repeat this step until all relevant contributions are added to your comparison.
If you additionally want to add a paper to the comparison that is not yet in the ORKG, you can follow the rest of this tutorial.
-
Step 6: Once you have added at least 2 contributions, click on View comparison. Now you can see a preview of the comparison that you can tweak to your liking. Please also see here, for information on how to organize the comparison.
-
Step 7: If you are satisfied with the comparison, you either publish your comparison. You can also save it as draft and come back to work on it later. You can find details on how to do that here.
Option 2: Using the Contribution Selection
This option is very useful if you are browsing content in the ORKG and want to create a comparison from interesting contributions you came across.
If you are viewing a paper, you always have the option to add all contributions of that paper to a comparison by selecting the check-box labelled Add to comparison.
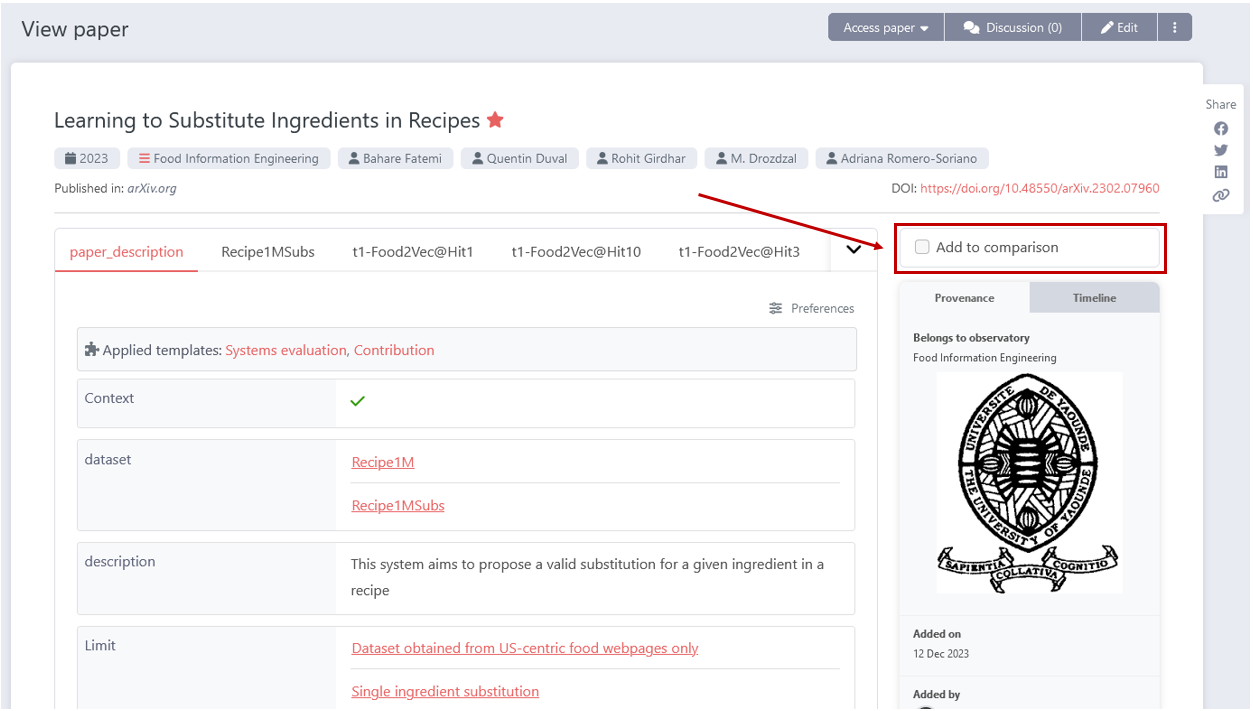
This opens a red pop-up on the bottom right of your browser window. It shows you all contributions that you have currently selected. If you want to add more, you can do so by continue browsing ORKG papers. Don’t worry, the contributions you have already selected, will stay selected. You can also remove selected contributions by clicking on the x.
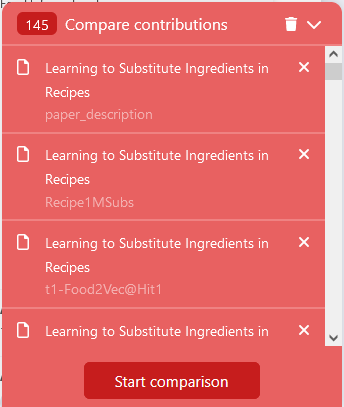
If you are happy with your selection, click on Start comparison.
Now you are ready to move on to the next step and tweak your comparison to your liking by clicking here.
Creating a Comparison via CSV import
This tutorial shows you, how to add a comparison to the ORKG using our CSV import tool. It is very useful if you have multiple papers that are not yet in the ORKG and you maybe even have information about the paper in a CSV format already.
-
Step 1: Download the CSV Import Template and familiarize yourself with the formatting guide.
-
Step 2: Sign in
-
Step 3: Click on Add new and then Comparison
-
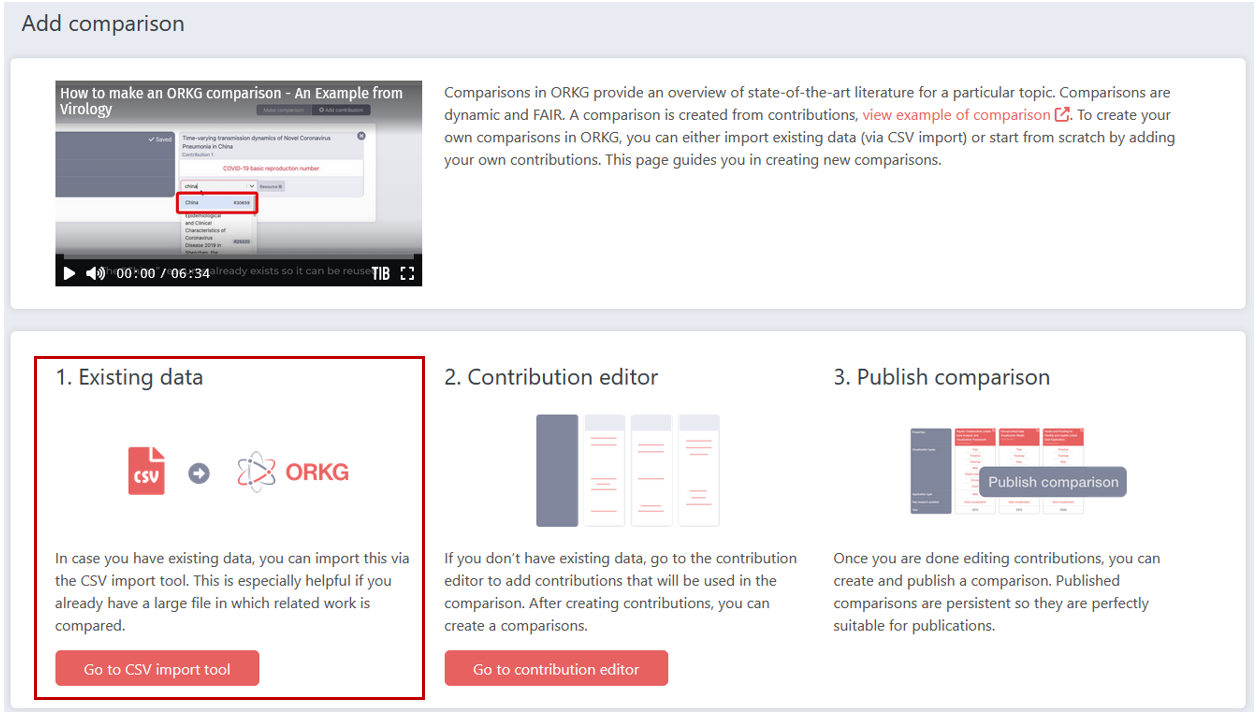
Step 4: This leads you to an overview page for adding comparisons. Choose option 1 "Existing data".
-
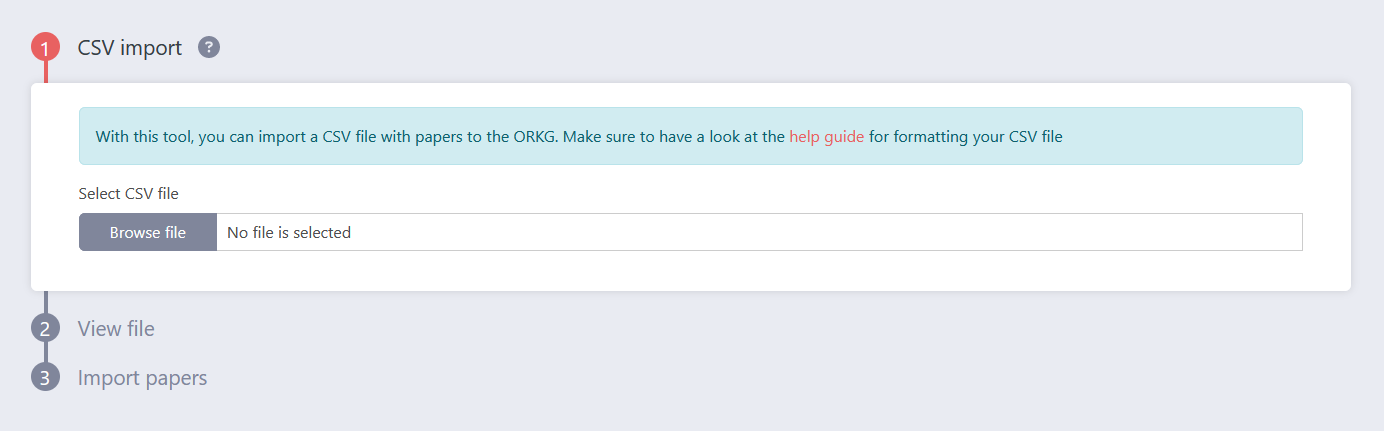
Step 5: Follow the step-by-step instructions for the CSV import tool and make sure the CSV file is correctly formatted.
-
Step 6: Tweak the comparison to your liking. More information about this here.
Visualization Tutorial for Comparisons
The ORKG provides you with the possibility to create visualizations for numeric properties of comparisons. This is how you do it:
-
Step 1: Sign in
-
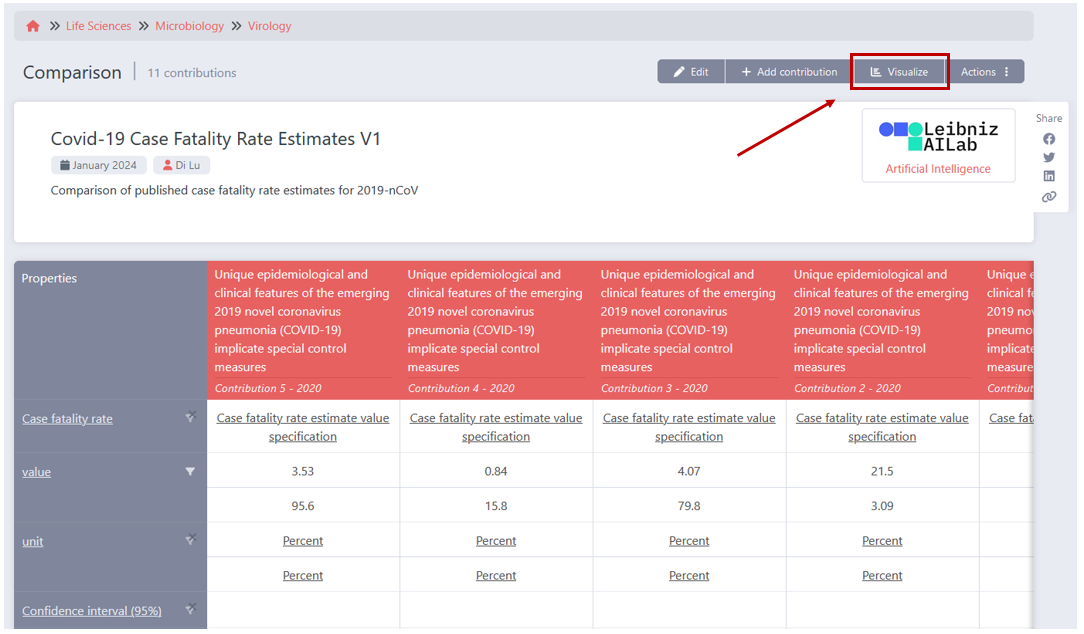
Step 2: Find and open the comparison that you want to add a visualization to. Then, in the Comparison View, click on the Visualize button.
-
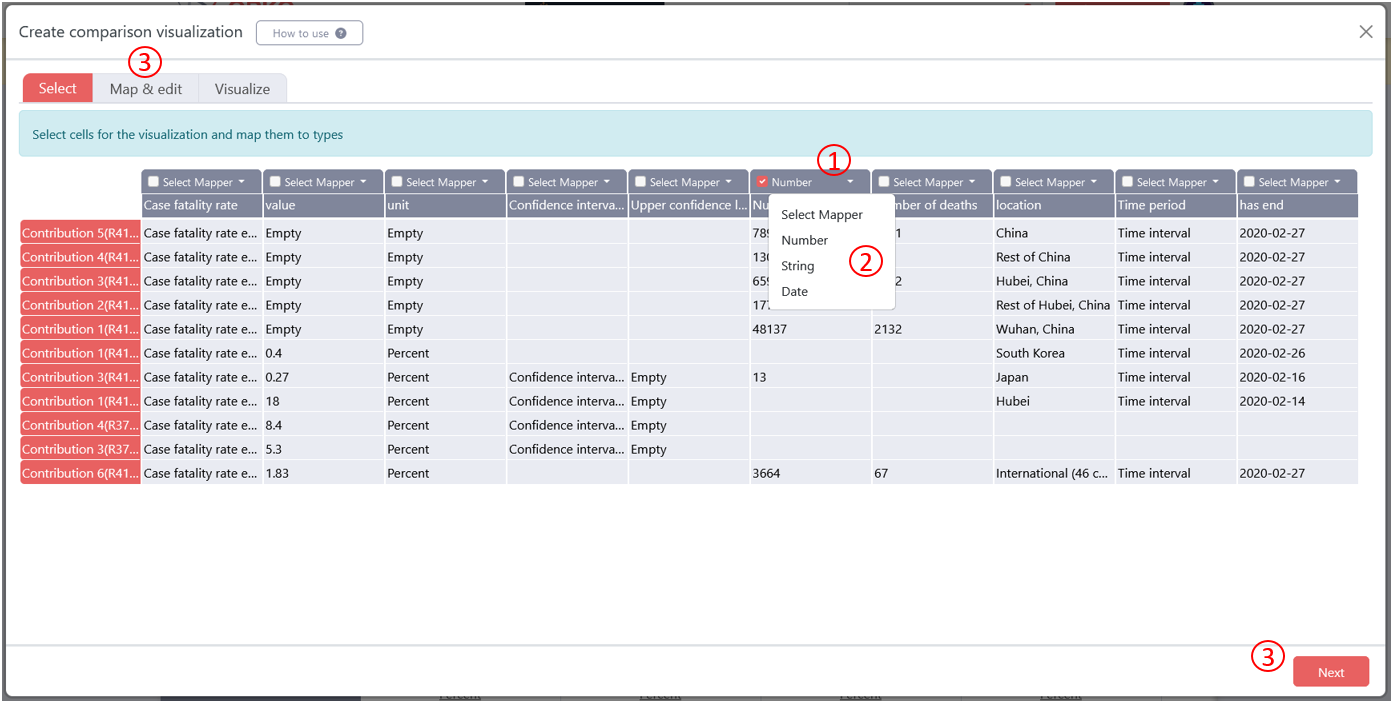
Step 3: A pop-up appears that lets you specify which data you want to visualize and how you want to visualize it. (1) You need to select the columns, i.e. the properties, that you want to include in your visualization by checking the respective box in the table header. (2) Then, you need to select the type of data that is represented in that column. You can choose from three types in the drop down: Number, String or Date. (3) Now you can move to the next step by either clicking on Next in the bottom right or clicking on the next tab Map & edit
-
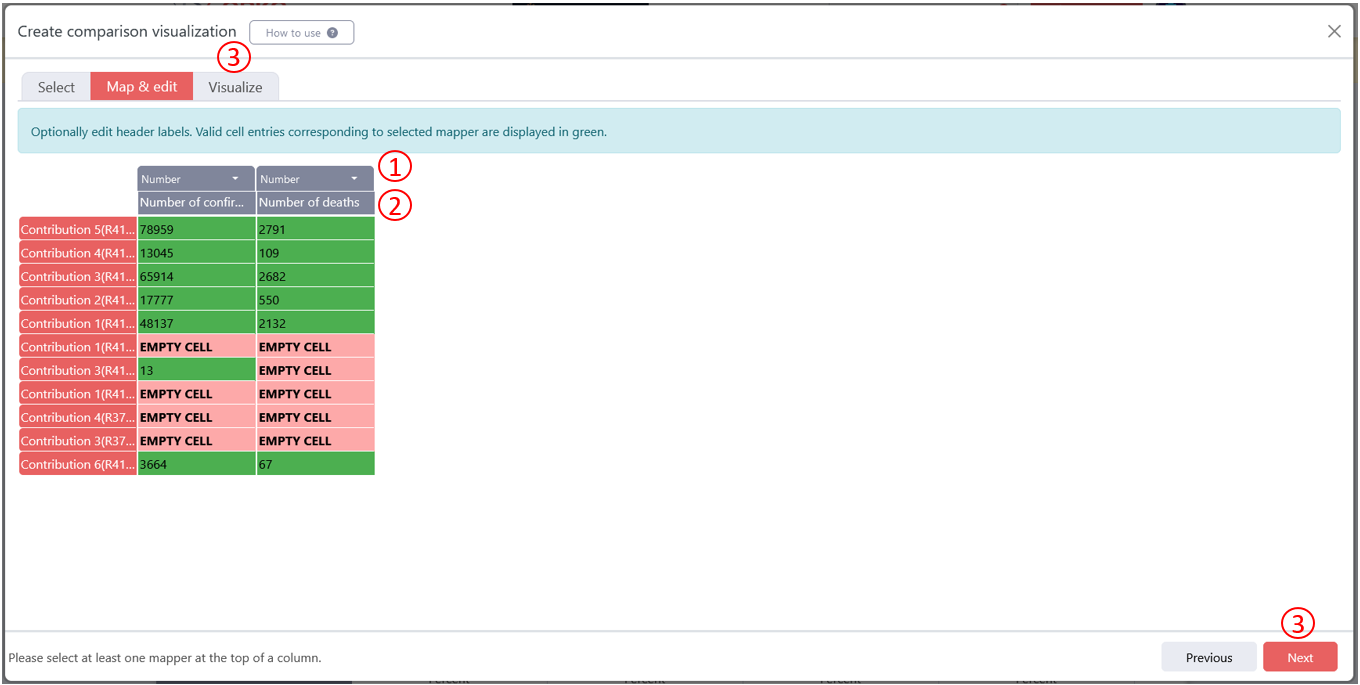
Step 4: On the Map & edit tab you have again the chance to select the right type of data for each column (1). The green cells indicate that the value found in the cell matches the data type that has been selected. (2) Then, you also have the opportunity to change the name of the column to something that you want displayed in the final visualization. (3) Once you are happy with that, you are ready to move on to the last step by clicking on Next or on the Visualize tab.
-
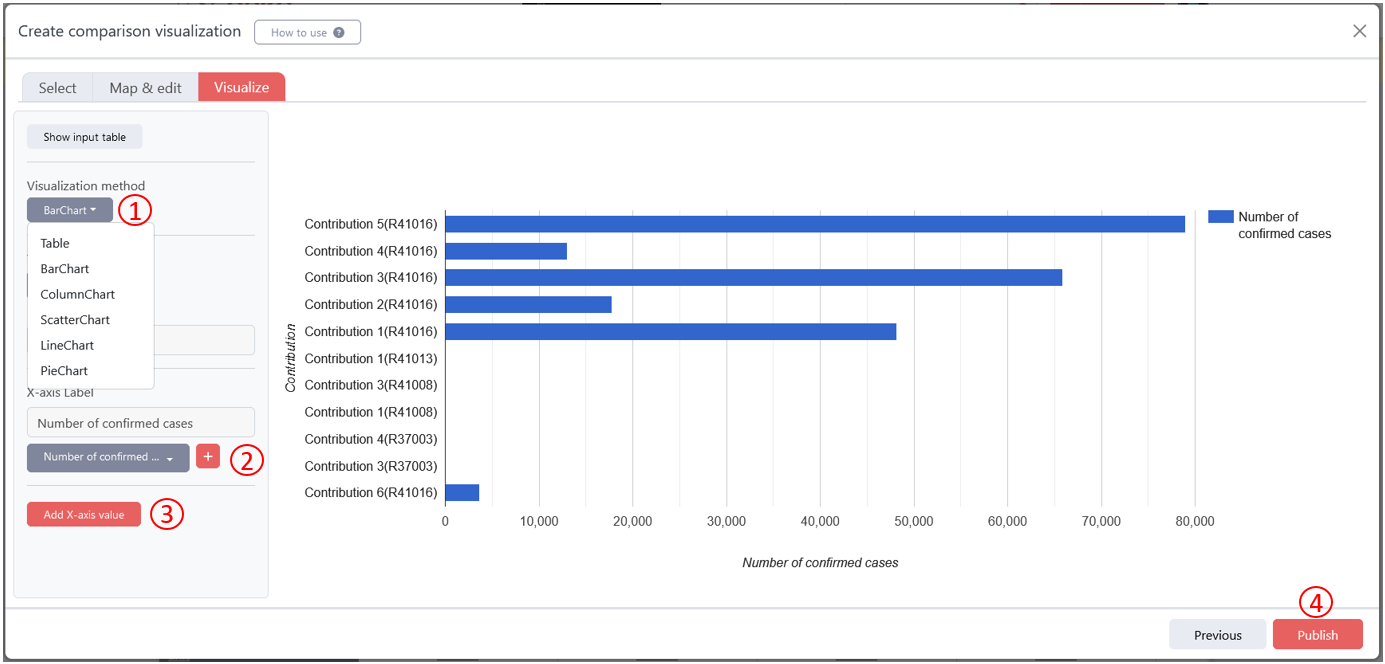
Step 5: (1) Choose the type of visualization that you want to create. (2) Next, choose the variables that should be displayed on the axes. (3) You can also add additional variables for the X-axis. If you are happy with the result shown in the preview, (4) you can publish the visualization. A published visualization will appear on the comparison view of the comparison it belongs to.
If you need some visual guidance, have a look at this video.
If you would like the scientific background, you can read this publication: - Vitalis Wiens, Markus Stocker, Sören Auer: Towards Customizable Chart Visualizations of Tabular Data Using Knowledge Graphs. ICADL 2020: 71-80
Comparison Organization
The ORKG offers you many options to tweak the presentation of your comparison. Here, you will learn how to organize your comparison in the ORKG.
You can only edit the presentation of unpublished comparisons. If you want to tweak a published comparison, you will need to create a new version of it. For this, please see our guide on how-to update the version of a comparison.
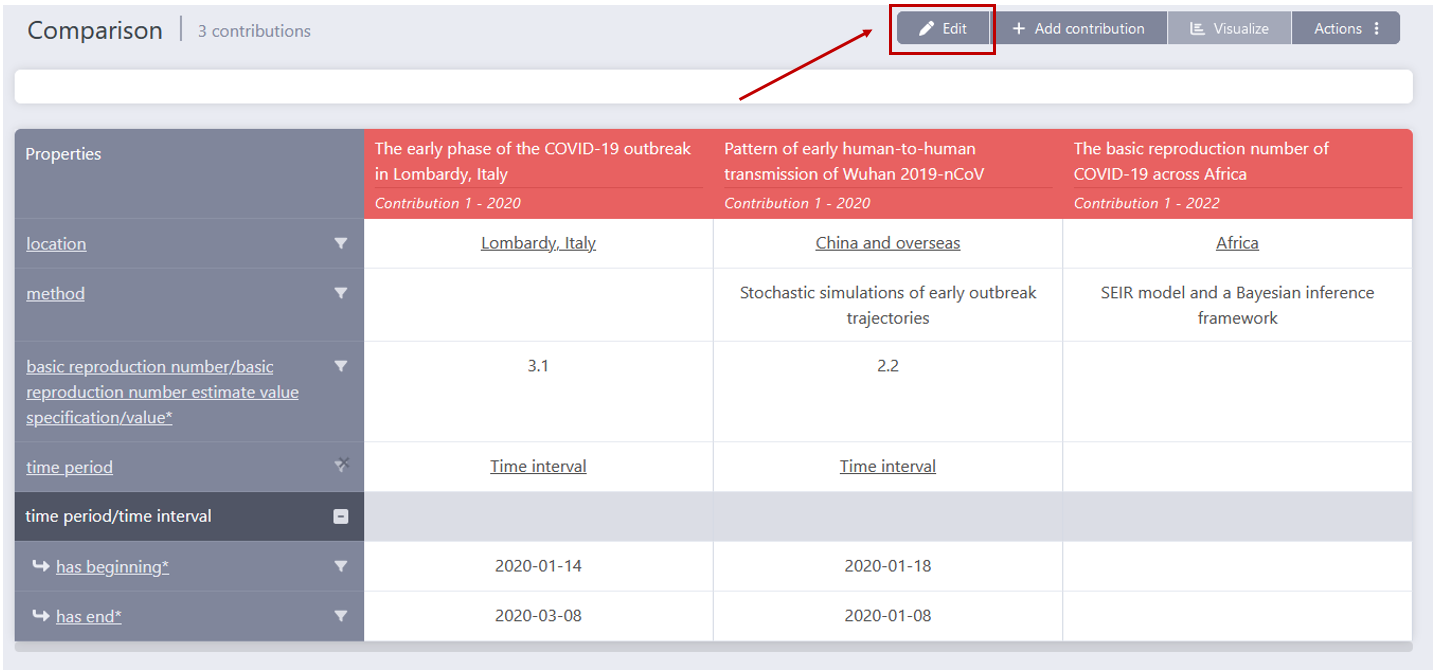
To alter the look of your comparison you need to enter the edit mode of the comparison. For this, you open the comparison, you want to prettify and then click on Edit on the upper right side.
Once you are in edit mode, you have many options that allow you to tweak your comparison’s presentation:
-
You can put the properties in any order you like. Just click on the property that you want to re-order and drag it into the position you want it in.
-
By clicking on the funnel symbol next to the property name, you can filter the values for this property. This can be handy if you, for example, only want to include contributions in a specific period of time, etc.
-
You can also re-order contributions by dragging and dropping them in the places you need them to.
-
Deleting contributions is also possible by clicking on the x in the right corner of the column header for that contribution.
Aside from the edit mode, you have some more options when clicking on Actions in the upper right corner.
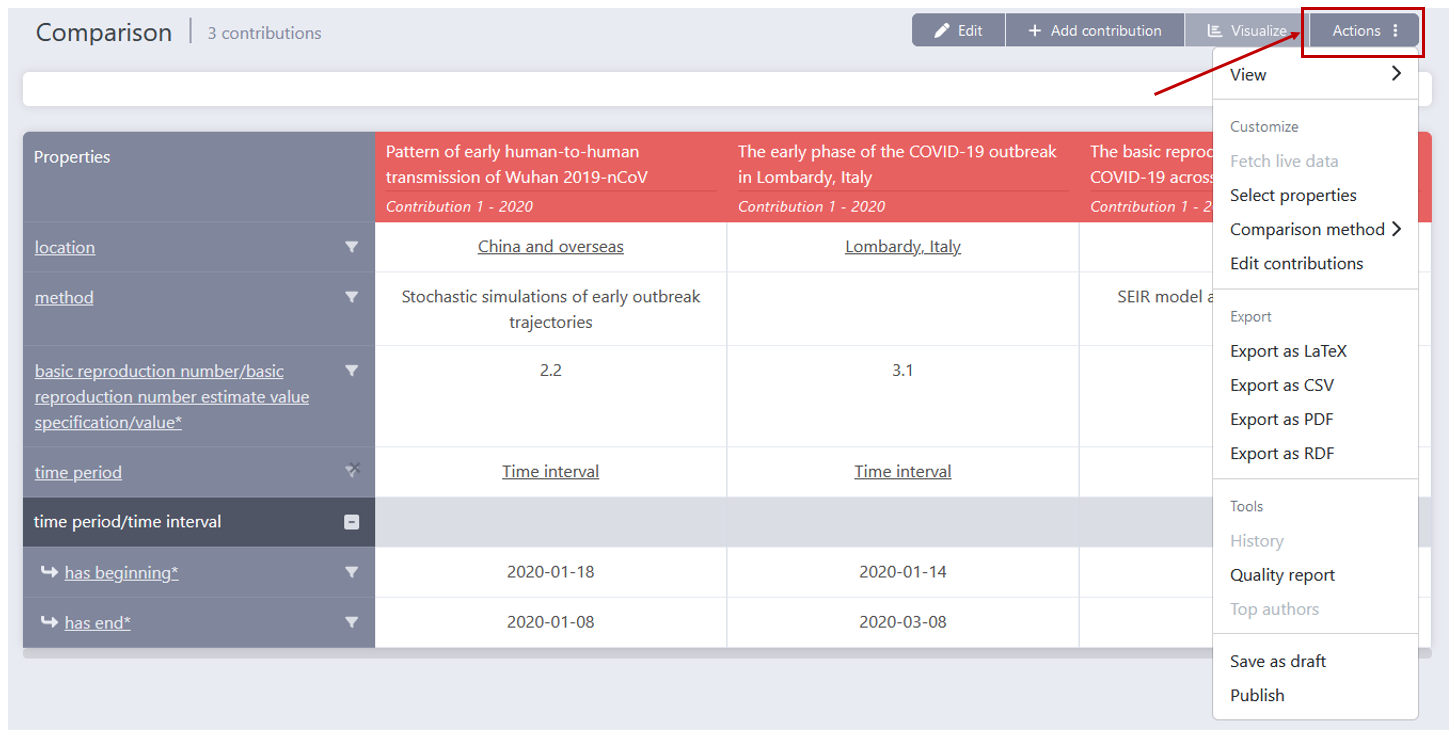
Under View, you can find a few options to change the appearance of the comparison, that do not require an updated version of the comparison. As a result these changes are not stored permanently for that comparison and need to be re-done once you load the page again.
-
Full widh: This button stretches the comparison across the full width of your screen.
-
Transpose table: This allows you to see the properties as columns and the contributions as the lines of the comparison table.
-
View density: These tree buttons (Spacious, Normal, Compact) allow you to adjust the space the cells take up on your screen, allowing you to see more or less content at one glance.
Under Customize, you can find even more options. These options alter the comparison and are therefore only available for non-published comparisons or if you want to create a new version of a comparison.
-
Select properties: This button opens a pop-up that lets you choose the properties you want to include in your comparison.
-
Comparison method: Here you can select whether you want the compared properties to match exactly or be merged intelligently.
-
Edit contributions: This button takes you to the contribution editor for that comparison.
Now you know everything about editing the appearance of a comparison in the ORKG. If you are satisfied with the contents and the look of your comparison, you can finally publish it as a last step.
Publishing or Saving a Comparison
If you are happy with the contents and the look of your comparison, you can finally publish it. For this, click on Actions in the upper right corner and select Publish at the bottom of the menu. Enter all necessary metadata. You can even associate your comparison with a DOI if you want to. Then click on publish.
| Once you have published a comparison, it is permanently added to the ORKG and cannot be changed. You can only create newer versions of a comparison. |
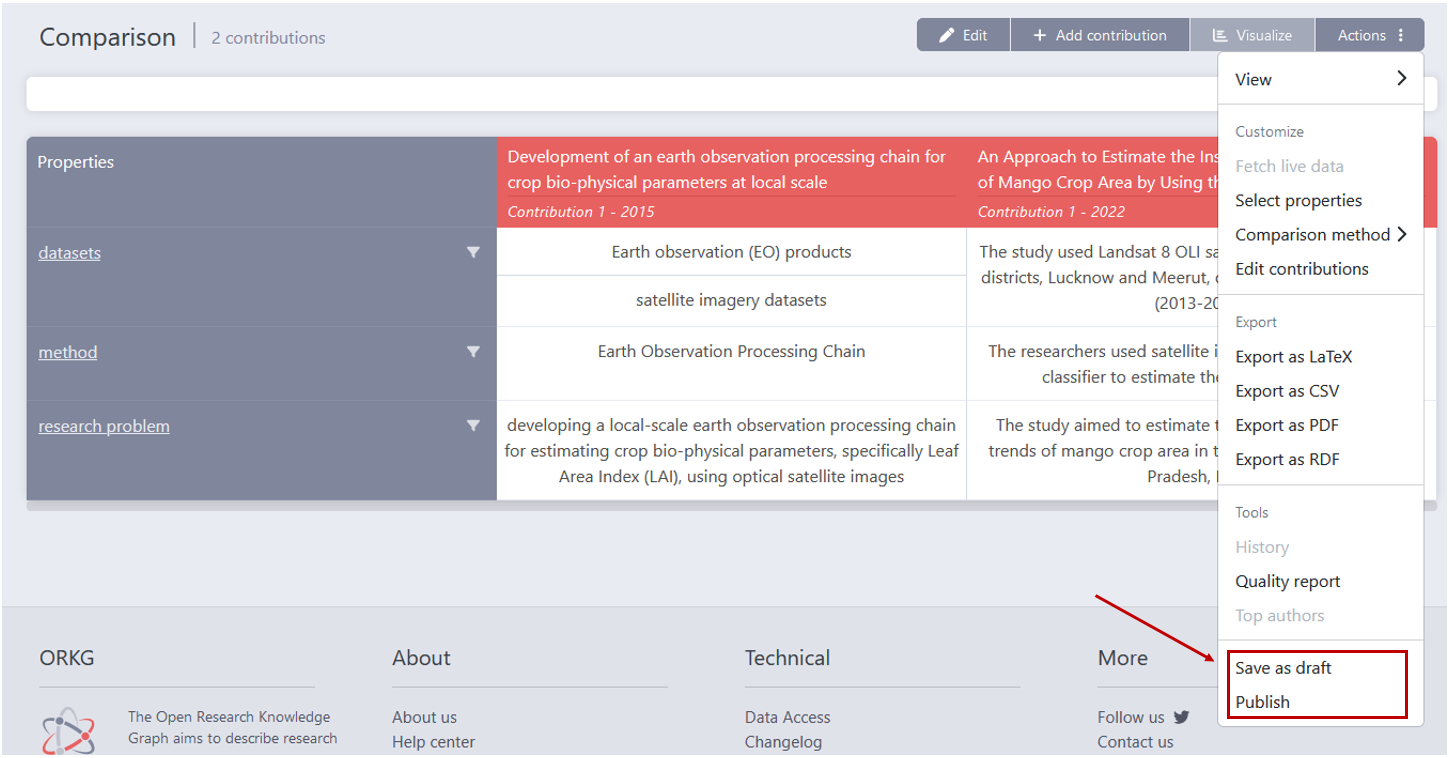
If you are not yet ready to publish your comparison permanently, you can save the current state as a draft. For this you can click on Save as draft and enter a working title of the comparison in the pop-up window. Then click on Save.
You can come back to your draft at any time. You will find your draft comparisons under My account > Draft comparisons.
Updating a Comparison
Published ORKG Comparisons are persistent, i.e. they cannot be changed after publication. If you want to change an existing comparison, you need to create a new version of it. Follow this step-by-step tutorial to learn how this can be done.
-
Step 1: Open the Comparison you want to update, click on the three dots in the upper right corner and click on Fetch live data

-
Step 2: Now you can edit the comparison as usual. If you want more information on the edit mode, check out one of our three comparison tutorials above.
-
Step 3: Publish or save as draft
Further Information
Congratulations! You’ve made it to the end of the ORKG Comparison Course.
Hopefully, it was helpful to you and you found the right way for you when it comes to the creation of ORKG Comparisons.
If you are now looking for some more inspiration or examples of other users and what they accomplished using ORKG Comparisons, please take a look at our Stories and our yearly Curation Grants.
Also check out the rest of the ORKG Academy where you can find more useful courses like this one regarding other features and tools of the ORKG.